Advanced Avatar Settings
The Advanced Settings are the equivalent of what another game's SDK 3 allows you to do. The main difference is that the Advanced Settings are easier to use.
Here you'll see how to:
- How to toggle a GameObject.
- Have a slider to change the colour of an element on your avatar.
- How to generate the animator.
- How to register a profile.
- How to have a slider that interacts on a blendshape.
To activate the Advanced Avatar Settings, check Enable Advanced Settings at the bottom of the CVR Avatar component. (Image 1)
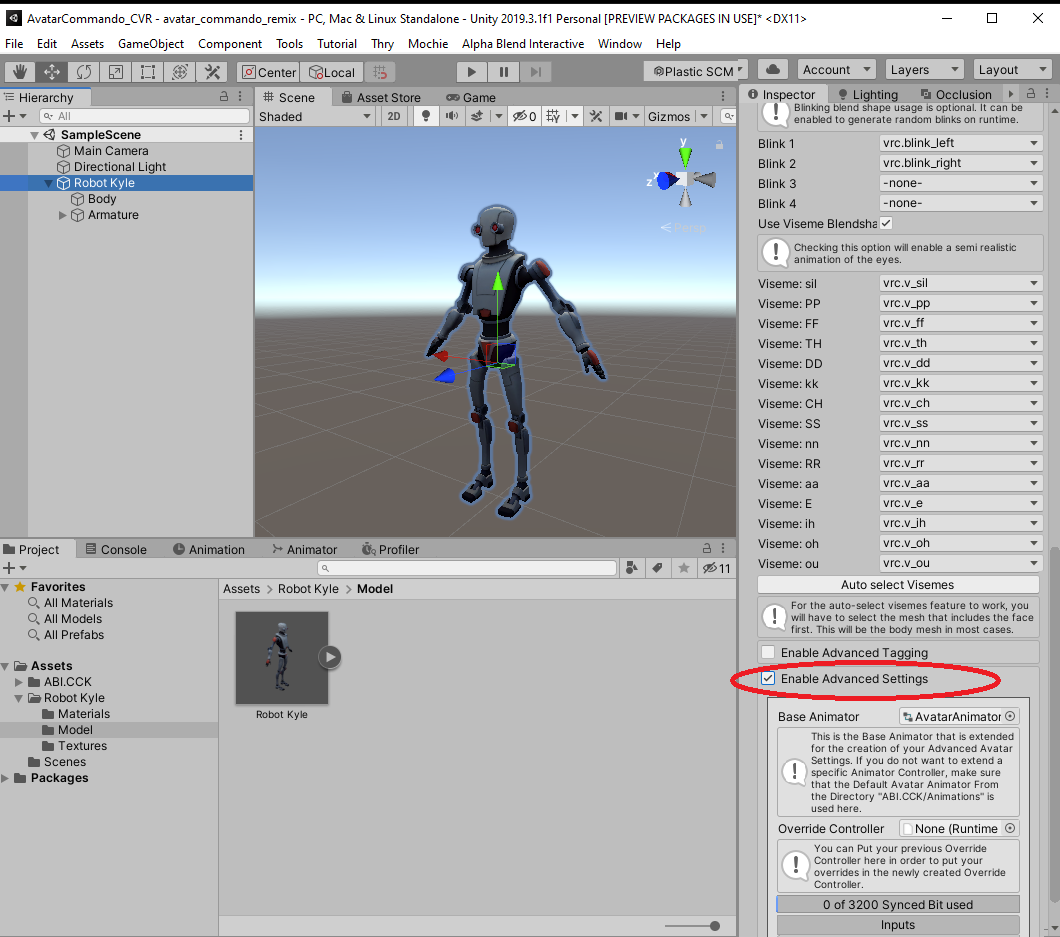 Image 1: Activating advanced settings.
Toggle a GameObject
- Press on the small + to add a slot. (Image 2, step 1)
- Put a name that correspond to what will be toggled. (Image 2, step 2)
- Set the Type as Game Object Toggle. (Image 2, step 3)
- Press on the small + to add a GameObject. (You can add multiple GameObjects by pressing the + again) (Image 2, step 4)
- Drag and drop the GameObject that you wish to toggle and it's done! (Image 2, step 5) (The Set to allows you invert the toggle)
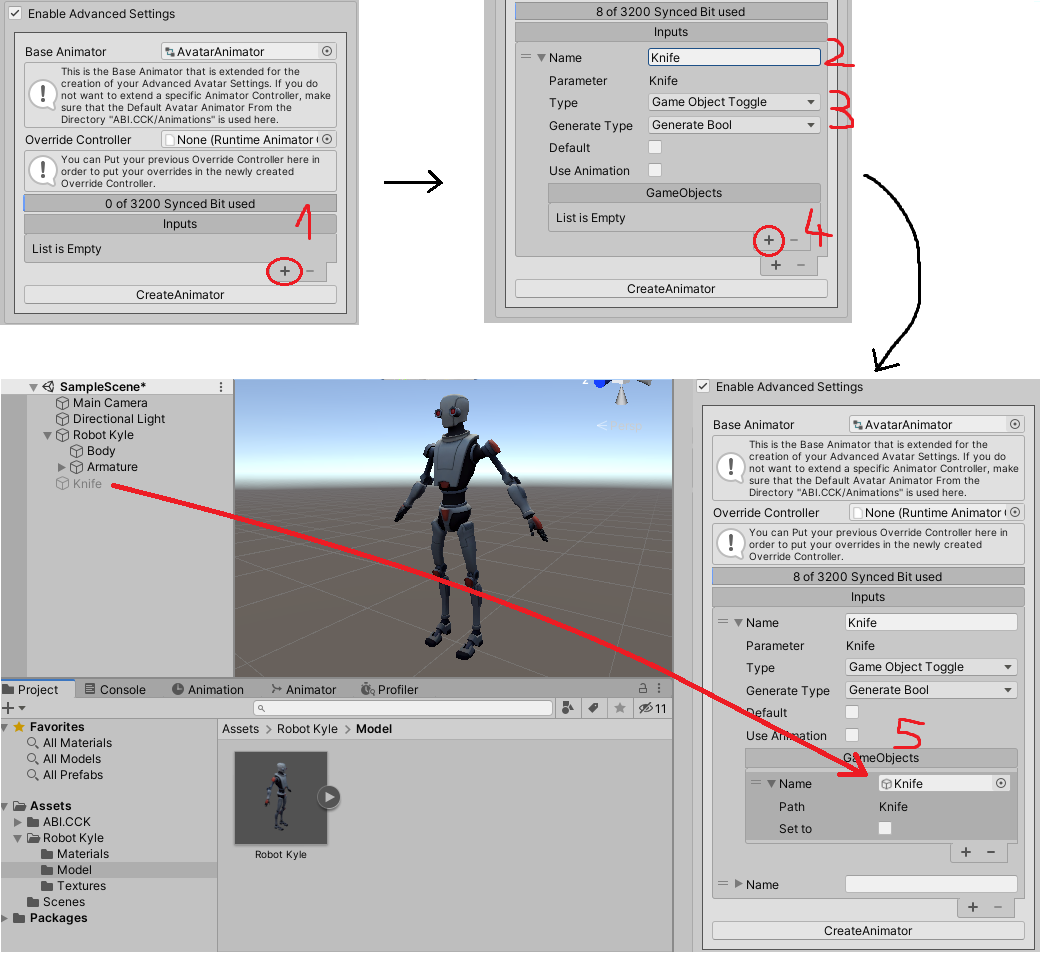 Image 2: Toggle a gameobject with advanced settings.
Have a slider to change the colour of a part on your Avatar
- You can repeat the step 1 and 2 on the Image 2.
- Set the Type to Material Color.
- You can choose the default color, but you will be able to create profiles of Advanced Settings in game later.
- Create a slot by pressing + to insert the GameObject that needs to be affected by the slider. Then you will have to chose a property that depends on the Shader you are using. On the image I am using Poiyomi, the property name is SkinnedMeshRenderer Color & Alpha. You can add more slots and then have other elements affected at the same time (i.e. emission). (Image 3)
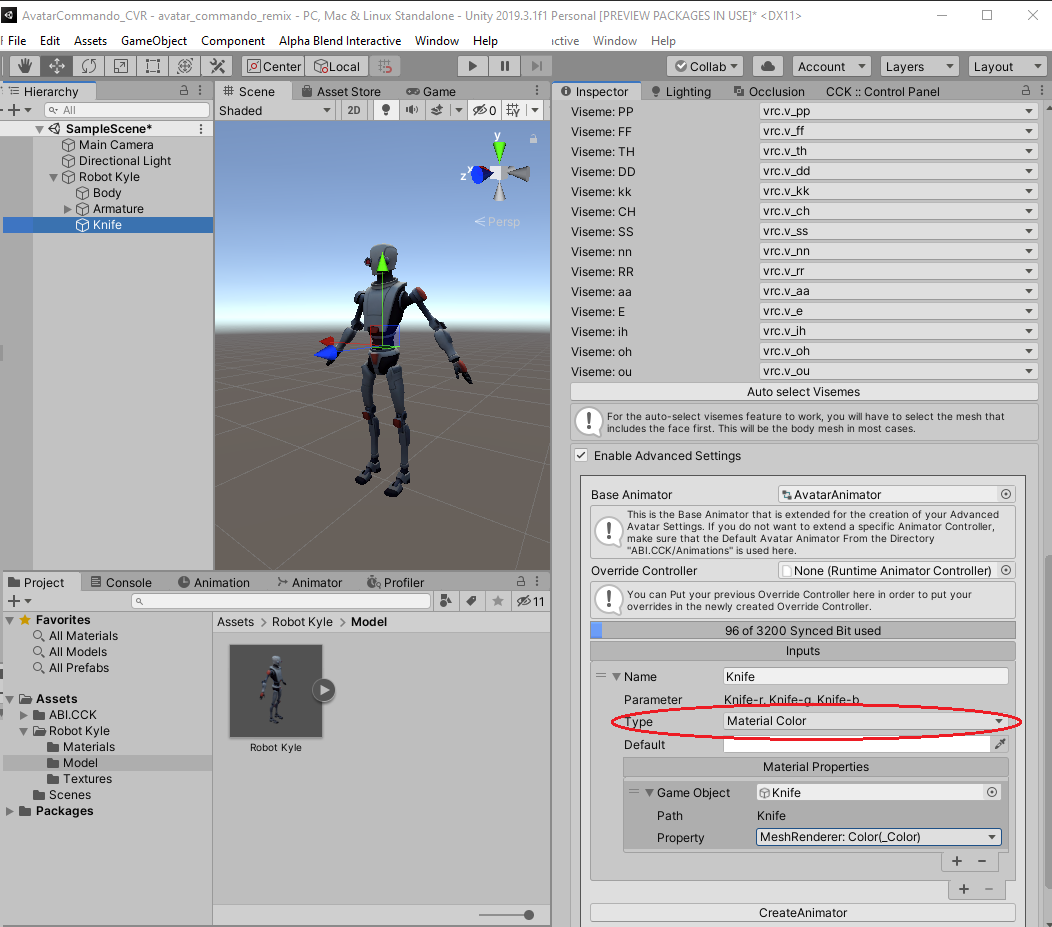 Image 3: Change the color of a GameObject with advanced settings.
For everything to work correctly, put your textures on a software like Photoshop/Krita/Gimp to remove existing colors. Your textures needs to be black and white!
Generate the animator
Done with your parameters in the Advanced Settings? You can then press Create Animator and then Attach created Override to Avatar and that's it! (Image 4)
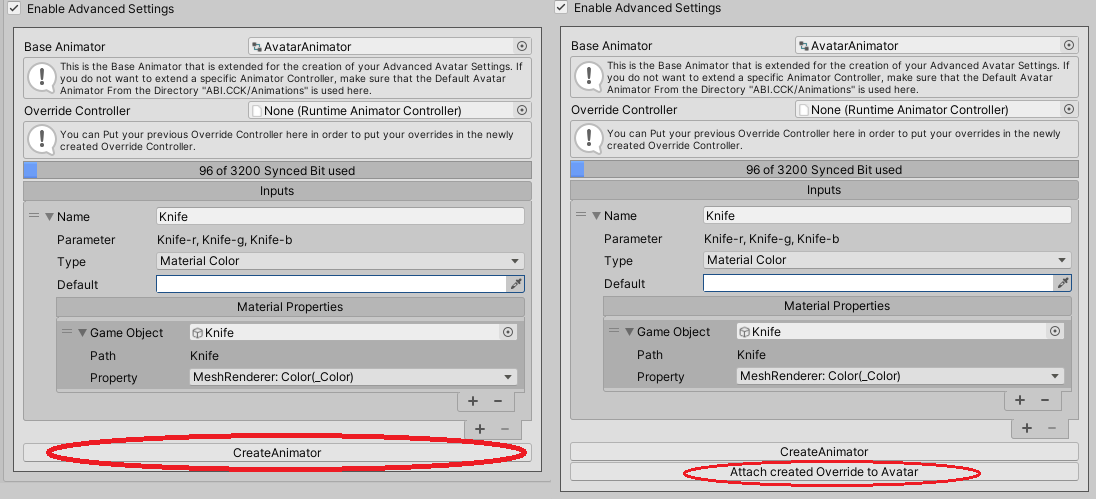 Image 4: Generating the animator with our advanced settings.
Advanced Avatar Settings in game
Changing the settings
Now that you have uploaded your avatar with Advanced Settings and you are wearing it. You can go to the Home menu in game. You will find there a Adv Avtr button. (Image 5 and 6)
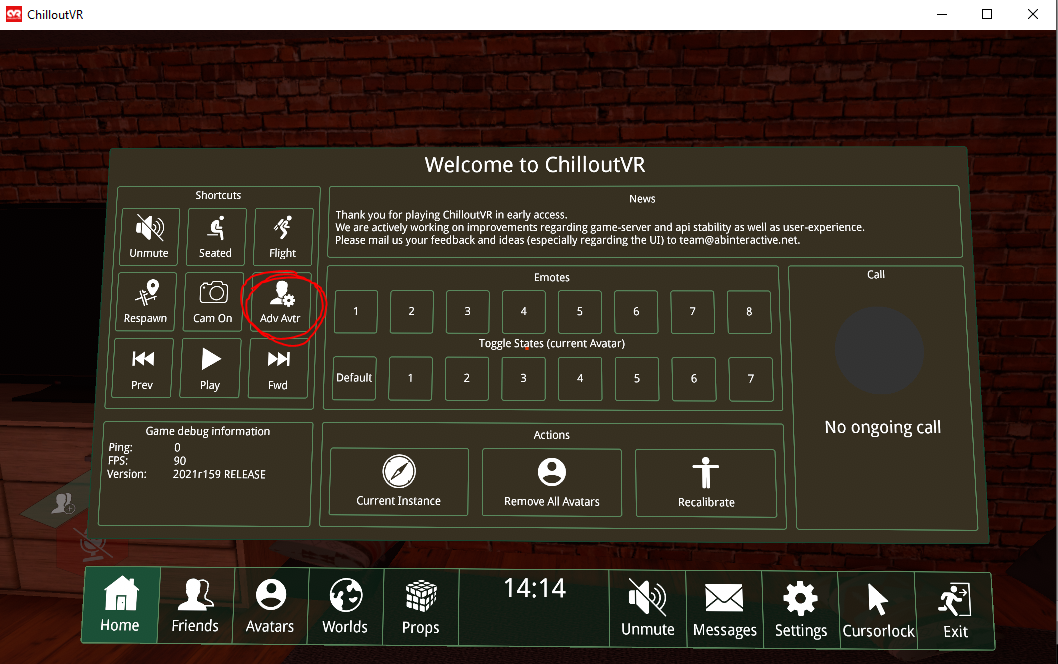 Image 5: Access the Advanced Settings in game.
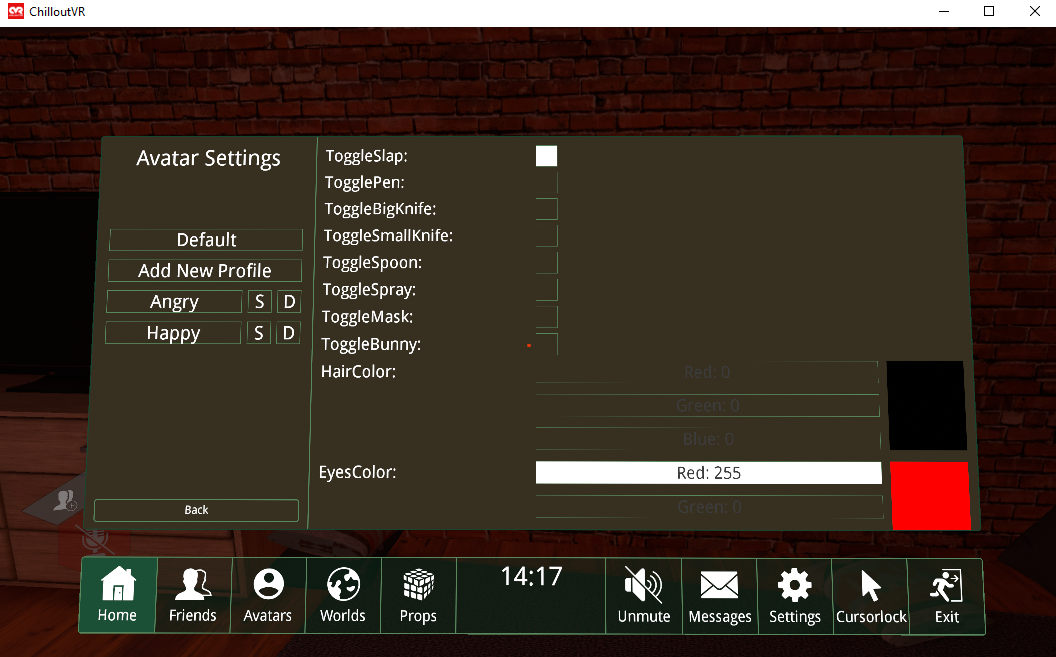 Image 6: Advanced settings menu.
The generated animator and override controller is stored in Assets/AdvancedSettings.generated/[folder_with_the_name_of_your_avatar]. The empty Override Controller there will have been automatically assigned to your CVR Avatar component. The Override Controller will be emptied everytime you generate the animator. A tip is to move the filled Override Controller while generating a new animator as to avoid having to redo it everytime. While always checking that the one you saved is the one used by your CVR Avatar component.
Create a settings profile
In game, on the Adv Avtr submenu of your avatar, you can create profiles. In example, on Image 6, my avatar has a profile named "Angry" and another named "Happy". On "Angry" my avatar has black hairs and red eyes, but on "Happy" my avatar has white hairs and eyes.
A profile will allow you to have multiple versions of your avatar registered. When you go to another instance, the selected profile will stay active.
- To create a profile, click on Add New Profile (Image 6), give it a name and then press Enter.
- Set your advanced settings how you want them to be on that profile. Then you can press on the S button next to the profile's name to save your modifications (Image 6). The D deletes the profile.
Have a slider that interacts with a blendshape
- In the Advanced Settings, create a slot that has for type Slider, add a slot to modify a property and put in a random object. We will override that later in the animator itself. Set as minimal value 0 and as maximal value 100. Then generate the animator. (Image 7, Advanced Settings)
- Create an animation with the blenshape you want to modify with the slider. An animation min where the blenshape is at the minimal value you want it to be and another animation max one with the maximal value. (Image 7, Animation Min & Animation Max))
- Go to Assets/AdvancedSettings.generated/Folder_With_Your_Avatar_Name/ and double click on the controller.
- In the controller, select the layer with the name of your slider. Then double click on the orange box that has the name of your slider + Blend tree. (Image 7, Controller)
- In the Blend Tree, click again on the box that has the name of your slider + Blend tree and assign your Min and Max animations you created earlier. (Image 7, Blendtree)
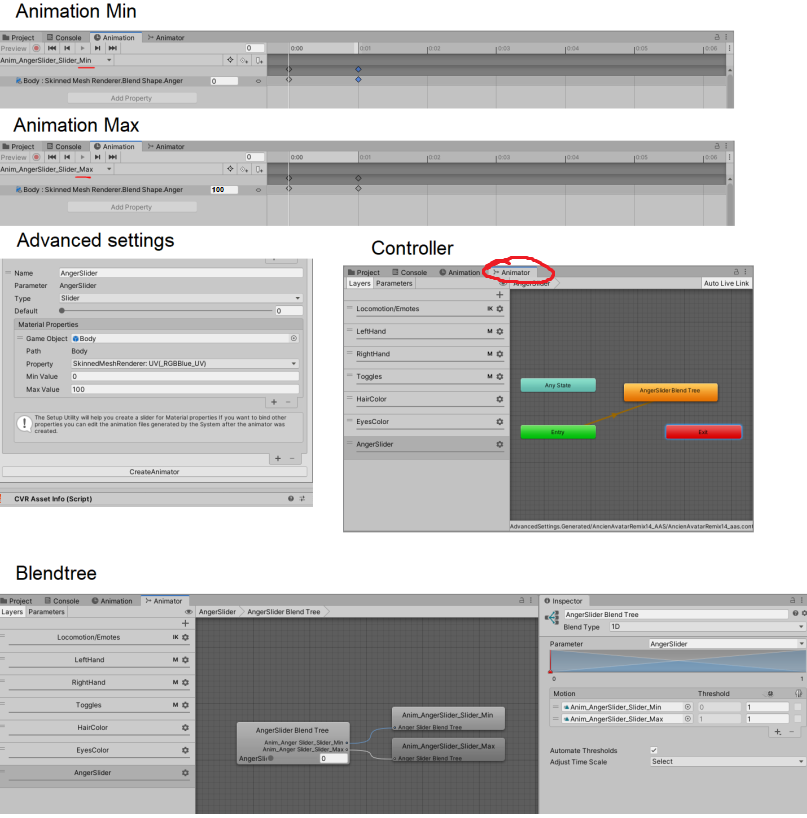
Image 7: Create a slider that affect a blendshape with advanced settings.